Thursday, 27 February 2014

Creating Burns


Creating Burns


When creating a burn, it is important to think about the colour, shape and texture of the burn. Consider the extent of the burn; the cause of the burn; the age of the burn; infected burns as well as shock and swelling.  There are also many different types of burns - exposure to heat is what you will immediately think of but also consider burns resulting from extreme cold, sunlight, chemicals, friction, radiation and scalds from hot liquid.  You will also need to consider the direction of the burn.
Fire Burn

Chemical Burn
Equipment needed:
-Tissue
-Supracolour palette
-Spirit gum
-Pin
-Hair dryer
-Brushes
-Gelatine
-Fake puss

Instructions: 
-Rip up thin sheets of tissue paper and layer onto skin using spirit gum and an old brush.
-Layer and wrinkle up the tissue to create texture.
-Create rips to make the skin appear broken using a pin.
-Dry using a COOL hair dryer.
-Add colour to the tissue from the supracolour palette using a brush and blend with fingers.


-To create an even more realistic effect, use gelatine warmed up in the microwave.
-Warm up by placing in a bowl of cool water and heating for approximately 60 seconds.
-MAKE SURE THE GELATINE IS AN APPROPRIATE TEMPARATURE BEFORE APPLYING
-The gelatine comes in 2 main colours; 'burn' and 'scar', but it can also be mixed for a more desired colour.
*      * Gelatine can be used anywhere on the face and body- no barrier cream is needed
       * It comes off with warm water
       * It is long lasting
       * You can apply makeup on top of it or mix it with Supracolour
     -Apply the gelatine to create a shine effect of the flesh or a wet look blood.

Tuesday, 25 February 2014

Estella Hair Designs

I looked at various photo's on Pinterest for inspiration for my Estella hair. I focussed mainly on up do's that has plaits, twists, rolls and curls, as I wanted to create a soft, feminine look, as mentioned previously. http://www.pinterest.com/leesnyman/estella-inspiration/ 

I also decided to explore the key words "bent", "broken" and "survivor", but I found it really difficult to find hairstyles that expressed these keywords. http://www.pinterest.com/leesnyman/bent-and-broken-hair-inspiration/

I started to experiment on a dolls head, using a variety of techniques we had learned about Victorian hair, and some of the ones I saw on Pinterest.

Here are the looks I created:

Look 1

For this hairstyle I sectioned the hair into 3 sections. The front section I separeted into a middle parting, to give more of an aged look to Estella. I then rolled the middle section around a piece of wadding to give a little bit of height, before pulling the final section into a French Pleat, to add the Victorian element. I like the overall look of this hairstyle, it is not quite as soft as I would like it to be and I think the parting looks a little too harsh.

Look 2 

The second style is very similar to the first, but this time, I pulled the front section into a side parting, and to furthur soften the look, I pulled a few tendrils out at the sides of the head. Although I prefer this look, I think it is a little bit too youthful, and reminds me more of a wedding hairstyle. The middle section also looks a little bit too detached from the rest of the style, in both looks particularly in the profile shot.

Look 3

My final idea was to pull the hair into a bun at the base of the head, with two plaits pulled around from the front of the hair. I think this hairstyle is very pretty, but overall a little too basic, and it doesn't have enough of a Victorian feel to me.

For my final look, I would like to combine elements from Look 1 and Look 2. I will keep the middle parting, but soften it slightly by pulling some hair out on either side and curling them. I will also not be pulling the middle section down more, so that it blends into the hairstyle a lot more. 

Sunday, 23 February 2014

Estella Makeup Ideas

For my final Estella look, I would like to keep the makeup very simple, in order to keep it historical. I would like the overall makeup look to be quite plain, but still accentuate certain feautures to keep Estellas natural beauty. To do this, I will add a bit of contour around the eyes to accentuate them, and I will add some rosiness to the lips and cheeks. The Estella that I am portraying is the Estella at the end of the book. Therefore she will be slightly older (Approx. late thirties), so I will be using some ageing techniques to create some lines around the eyes, forehead and mouth.


Estella

Estella

http://www.dailymail.co.uk/tvshowbiz/article-2064629/GREAT-Expectations-Gillian-Anderson-leads-star-cast-BBCs-festive-adaptation-Charles-Dickens-classic.html
Estella is probably one of the most complex characters in great Expectations. We see her at first as a young girl at Miss Havisham's house at she comes across as extremely stuck up, spoiled and very detached.  Pip falls in love with her nonetheless and when she next appears in the story, she has grown into a woman. We find out she has been reared by Miss Havisham to break mens hearts. She warns Pip not to fall in love with her, as she "has no heart". Pip perseveres however, and there is a moment that we see a much softer side of Estella. When Pip learns that Estella is marrying Bentley Drummle, he pays Estella a goodbye visit. She acts very nonchalant about everything and tells Pip that she will probably be out of his thoughts in a week, to which Pip responds: "Out of my thoughts! You are part of my existence, part of myself. You have been in every line I have ever read, since I first came here, the rough common boy whose poor heart you wounded even then. […] Estella, to the last hour of my life, you cannot choose but remain part of my character, part of the little good in me, part of the evil. But, in this separation I associate you only with the good, and I will faithfully hold you to that always, for you must have done me far more good than harm, let me feel now what sharp distress I may. O God bless you, God forgive you!" 
- Quote from Charles Dickens novel 'Great Expectations', Chapter 44. 
http://www.rottentomatoes.com/m/great_expectations_2012/trailers/11182913/
Estella goes on to marry Drummle, as she was intended for. She endures a long suffering, abusive marriage to him, until he dies (approximately 11 years later) whilst mistreating a horse. A few years later, Estella and Pip meet again. It is the Estella at this point in the story that I would like to base my version of Estella on. She says to Pip :

“Suffering has been stronger than all other teaching, and has taught me to understand what your heart used to be. I have been bent and broken, but - I hope - into a better shape.”

-Quote from Charles Dickens novel 'Great expectations', Chapter 59, pg 379.


http://www.pbslearningmedia.org/resource/gtexp12.ela.lit.everafter/great-expectations-3-happily-ever-after/
I would like to show a much softer side of Estella. She is obviously a little older at this point in the story, and so I will use some of the ageing techniques we learnt, to age her a little bit. I plan to keep the general makeup very minimal, to stay historically accurate. 

In terms of the hair, I would like to keep the overall style very soft. I think of Estella as a survivor, but I think giving the hair too much height would give a much harsher feel to the look than I would like. 

Friday, 21 February 2014

Cuts, Cut Lips and Scratches

Equipment needed:
-Collodium
-Tuplast
-Fixer Spray
-Derma Shield
-Grease paints/bruise wheel

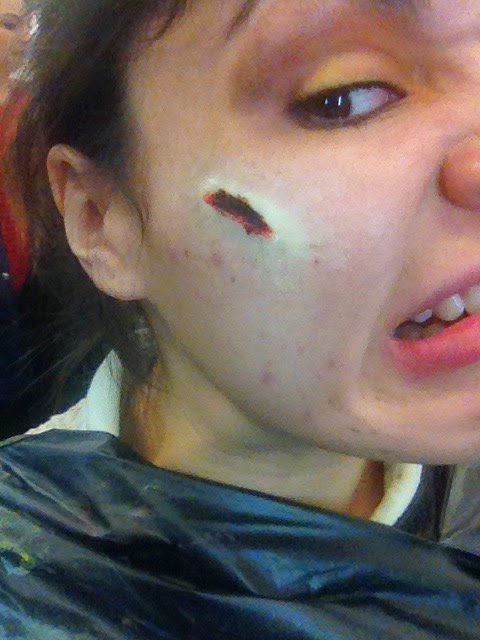
In our practical session we created cuts on the lip and scratches.

Creating cuts

Instructions:
-Start by applying derma shield to the area desired to protect the skin from the collodium as it is very alcoholic.
-Apply the collodium to the area where you want the cut to be, working fast as it drys very quickly. 

-Squeeze the lip together to create a deep cut appearance.


-Use a cool hair dryer to dry it and then its ready for makeup. I used a mixture of colour from the Kryolan bruise wheel to get the results for my cut.
-For a more gruesome look, or for more os a fresh cut look, just add fake blood or puss.


Creating scratches

-Apply lines of tuplast where you want the marks to be. You can use a small amount of powder on a cotton pad to take the shine away and flatten it out.
-You only need to use a small amount of colour on top of this. Dab it with your finger to blend and make it look less harsh, if you want it to look fresh just add fake blood.

Tuesday, 18 February 2014

Miss Havisham Timed Assessment Part 1

Below are some images from my first Miss Havisham assessment:


I thought that the final look came out really well. I was really fortunate that my model already had long hair, so it was quite easy to create the desired volume and texture when I back combed it and added the dry shampoo. The shape turned out exactly as I had hoped, and with the use of curling tongs and a comb, I added the curls to the side. I wanted to achieve a slightly lopsided effect with the curls, to make the style look even more deteriorated. I finished off by spraying dry shampoo directly onto the hair to give a greying effect. I do feel like I could have done this slightly better, or used a grey coloured hairspray, because in the photographs, her natural hair colour comes out much stronger, and the dry shampoo makes the hair look slightly more dusty than grey.
In terms of the make up, I am extremely pleased with how it turned out. I do feel like I could have been a bit stronger with my ageing makeup, as again, when photographed, the lines and wrinkled didn't come out as strong as I would have liked. You also cannot see the broken capillary veins at all in the photographs, as they are covered by the hair, which is something I did not take into consideration. Despite all of this, I am very pleased with how the look turned out. 

Sunday, 16 February 2014

Miss Havisham Chosen Design and Trials

This is the design chose for my final Miss Havisham look: 


Below are some images from my trials with Ashleigh, my model, both at home and in the studio:


Miss Havisham Make up Ideas


For my first Miss Havisham design, I wanted to create her looking very aged and unkempt. I wanted to create a lot of sallowness and sunkeness in the skin from years of bad diet and lack of sunlight. I thought bushy eyebrows would add a nice effect to this look, and I would create flakey, sore-looking lips. 


My second Miss Havisham design I wanted to try and incorporate age spots into the look. I would keep her face very pale, and add some lines and wrinkles in, adding age spots aroung her cheeks and forehead. I then did some research into age spots and found that they are mainly caused by too much exposure to sunlight. ( http://www.healthline.com/health/age-spots#Description ) This would not have worked with the character, as Miss Havisham never went outside, so I decided to leave this idea.


My final Miss Havisham design incorporates aged skin, and broken capillary veins or 'spider veins'. When researching this condition, I found that these can be caused by "a number of factors, such as malnutrition, disease and other  problems that traumatize the body and the immune system." 
Viewed on 5/02/2014
I would also like to incorporate flakes of dry skin around the mouth, to furthur the idea of malnourishment and dehydration. I will add some redness around the eyes, nose and mouth, and using contouring techniques, I will contour the face to give it a sunken look.


Miss Havisham Hair Idea

The hair I would like to create for my final Miss Havisham look will be based on a French Pleat. I plan to use simple, yet effective techniques to achieve the desired look. I want it to be quite a deteriorated look, but still quite graceful. To achieve this, I will back comb all of the hair, using products such as dry shampoo to give it texture and volume. Once this is done, I will then pull it into a secure french pleat, and then begin to loosen certain parts to achieve the look of the hairstyle falling apart.


Saturday, 15 February 2014

Creating 19th Century Illness: Sweat, Fever etc.

Equipment needed:
-Moisturiser
-Supracolour palette
-Black stipple sponge
-Brushes 
-Duo glue
-Glycerine
-Water spray
-Pipette

Instructions:
-Heavily moisturise the skin to allow easy blending.
      -Hollow out the face using sepia browns from the Supracolour palette. Apply with brush and     blend in with fingers.
      -Emphasise tired eyes by making the red round the lash lines. 
      -Make the skin appear flushed and rashy using a black stipple sponge and dabbing on red      onto the cheeks, forehead, nose and chin. Blend and dab with fingers.
      -Darken the lips slightly and blend out round the mouth slightly to create the effect of sore         lips.
      -Apply duo glue to the lips. Allow it to dry and start moving the glue to create the effect of          sore, dry lips. 
      -Darken areas of the dried duo glue to create the effect of cracks or sores.
      -Dab glycerine onto the skin to create the effect of sweat. Focus on the forehead, cheeks           and upper lip.
      -Spray water onto the face and around the hairline to make the skin look damp with sweat.    -Using a pipette, drop glycerine under the eye to form a tear drop.


Tuesday, 11 February 2014

Creating Silhouettes

We were given the task of creating an interesting silhouette that included a French Pleat at the back, wadding at the front, and included Victorian elements.
Following the steps in the previous look, I created my Victorian hairstyle. I then pinned a rose to the front of the hair, as this was very Victorian thing to do.

Here are the images I created:


Saturday, 8 February 2014

Cuts, Bruises and the Perfect Black Eye

Black Eyes


Equipment needed:


-Moisturiser
-Base
-Supracolour palette
-Bruise wheel
-Soft brush
-Small brush
-Red pencil
-Vaseline

Instructions:
-Moisturise the skin around the eye.
-Apply a light base.
-Using a soft brush, dab on colour from the supracolour palette or the colour wheel, making  sure to start with the lighter colours. 
-Blend in with fingers.
-Gradually working towards the darker colours and building up the bruise blending with  fingers.
-To create more detail, use the smaller brush to add the effect of burst vessels.
-Apply red pencil to the waterline. Blend in for a more natural look.
-Dab on vaseline over the deeper colours of the bruise to create a swollen effect.


Cuts

Equipment needed:
-Plasto wax
-Spatula
-Sealer
-Baby buds
-Hair dryer
-Hair pin
-Wound filler
-Fake blood
-Stipple sponge

Instructions:
-Using a rounded metal spatula, warm up plasto wax on back of hand.
-Smooth the plasto wax onto the skin and build up layers.
-Smooth the edges into the skin for a more natural look.
-Create a cut in the wax using the edge of the spatula.
-Using a baby bud, cover the wax in sealer.
-Dry with a cold hair dryer.

Wednesday, 5 February 2014

Creating Shapes with Victorian Influence

Creating Shapes with Victorian Influence:

Equipment needed:
-Dry shampoo
-Pintail comb
-Tongs
-Grips
-Pins
-Clips
-Hairspray
-Wadding
Instructions:
-Section off the front of the hair from ear to ear
-Follow previous instructions to create a French Pleat on the rest of the hair
-Backcomb the front of the hair to create volume, but make sure you only backcomb the back of the section (not the side that will be visible).
-Roll the backcombed section around a piece of wadding (a size appropriate to the amount of hair you are working with), and secure with hair pins.
-Ensure that the front section blends in to the back, where you have created the French Pleat, and use grips and pins to adjust the shape accordingly.
-Using a pintail comb, pull out two sections of hair by each ear, and using your tongs, curl each piece as a finish to the hairstyle.
-Finish with hairspray to set the style.